The HexaFrame.
THE PROJECT
For module seven of the IDE course (Design for Specific Users) groups were set the task of working in collaboration with an individual with the aim to conceptualize and produce a product that solves a unique problem to them. Through methods of co-design and the familiar design process we researched, brainstormed and prototyped our final product for our specific user. This website was created to document the process we have undertaken.
DESIGN CHALLENGE
"The goal is to design a product that allows the user to easily and efficiently create a collection of memories"

Case Owner
The specific user assigned to our project group is:
-
First-time mother living in Enschede.
-
She is 30 years old.
-
At the time of the interaction was nursing a 10 week old baby boy.
-
She lives with her husband.
-
At the time of the first interaction was not working, but has since started to ease back into her job.
-
Within their friend group they are the first to have a child.
Insights from the interview
From our first interaction with the participant we were able to identity areas within her life that introduced a struggle that was yet to be solved:
-
The newborn is dysmature, meaning he hasn't grown enough for the number of weeks since birth. This introduces different management plans, around feeding, sleep and growth.
-
Since birth the newborn has been experiencing ‘Gastro’ reflux/ hidden reflux. This has become a problem for the parents as the newborn cannot sleep in the recommended sleeping position on his back, and must be kept upright for sleeping and feeding.
-
The newborn is on a bottled diet. This means he must be feed every four hours, including throughout the night.
-
With the attention needed by the newborn, the parents are struggling to upkeep schedules, housekeeping, and a social life. This has had a negative effect on their overall wellbeing, particularly on the mother, who has taken on the majority of the responsibilities.

-
The participant finds it difficult to juggle taking care of herself and the baby, they currently have domestic help for general household upkeep every two weeks.
-
Due to all the stress and mental burnout they experience whilst raising their child they often forget or neglect the 'little moments'. Furthermore, when they want to organize photos and journal these moments they find themselves unable to dedicate enough time to do so. Further effecting their mental wellbeing.
Direction Change
Remediating Reflux
Emphasising Happy Moments
Originally we had chosen to focus on managing the reflux of the baby, resulting in our investigations and research to be centred around this theme. But with the data we collected and with further communication with the participant we determined that this path may create too high of a negative impact for the participants newborn.
Co-Design
In cooperation with the participant, we transferred to a design path on the organisation, arrangement and display of moments of motherhood and raising a baby. By making this our direction we are acknowledging the struggles, difficulties and heartaches of raising a child through the enjoyment and reminiscence of the moments in life that make it all worth it.
To introduce the co-design phase, the group first tasked the participant with capturing and collecting photos or videos with the newborn, of moments that brought her joy in her week. Once a week, we developed this into an album. By engaging with the participant’s daily life, we were expanding our understanding into her timetable, routine and lifestyle. This task also gave the participant the chance to pause her busy schedule and take time to appreciate the current moment more. Further helping to prove why we chose this design direction.
Moving forward, with the participant we discussed their needs and wants from the assignment.
We brainstormed its features, functionality in the home, size, and the style of the product.
These are the requirements set out by the participant:
-
The product must not be too complicated to use.
-
Its functionality must be kept to a minimum.
-
It must provide the same flexibility as a traditional photo frame to be displayed in the home or the workplace.
-
Create an interaction that is intuitive, easy to use and above all convenient.
-
We must reduce or remove tools needed in making a photo gallery like printers, glues, scissors and nails.
Due to the scheduling requirements of the participant we found it difficult to make time in which we could meet. But despite this we made the most out of digital communication to include her with our design process. Moving forward with the assignment we communicated with the participant to determine how she would like to interact with the product. Through the use of sketches we were able to convey our ideas and collaborate with her.


To bring some interaction to the device, we investigated how users of Instagram, google/Apple photos, and Tinder navigate through the platforms. With an understanding of how these apps organise, scroll, and interact with photos and videos, we submitted our proposed gestures to the participant to learn how she wanted to interact with the device.
Our question to the participant-
For the product we have thought about scrolling through pictures on the hexagon itself. These pictures would be automatically selected from your gallery, similar to what Apple does with their Photos widget, where it selects relevant pictures based on moments, people, location, etc. You can then do 3 things when the pictures show up on the hexagon:
1. Scrolling through the pictures. You would do this, for example, when you want to see a new picture or want to get back to a previous picture.
2. Disliking a picture. You would do this when you no longer want to see one of the pictures. This picture will then not appear on the screens anymore, but it will remain in your gallery.
3. Liking a picture. You would do this when a picture shows up that you really like. The liked pictures will then be collected in an app so that you can build up a collection of actual meaningful moments.
Another function that seemed interesting to us is that at random moments, a question will pop up on the screen. These questions will be there to make you think about the situation and to reflect on the happy moments, a bit like de questions on the teabags of Pickwick. An example can be: "Which moments with my baby make me happy lately?" or "What is something funny that my baby did today?".
We would like to hear your opinion of the things through the following questions:
1. What do you think of the interaction with the product (scrolling, liking, etc.)
2. What do you think of the question function? Do you think this is a valuable addition?
3. Which scrolling directions feel natural for you? You can use the attached image for this. We would like to know which directions you would swipe for: next picture, previous picture, liking, and disliking.
Look forward to your answer! :)
Participants response-
I think the question function is a really fun idea. The scrolling direction that seems most natural to me is how you would do it on your phone.
So the blue arrow in the picture.
For liking maybe something like a double tap? Just like Instagram for example.
And disliking swiping downwards? So the red arrow?
That's what immediately came to mind.

Colour Palette 1

Colour Palette 2
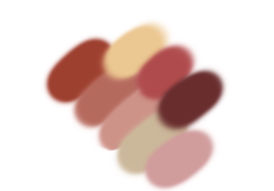
Chosen Colour
Palette

We tasked the participant with creating a moodboard for how she wanted the product aesthetics to look. We then used this board to make the colour palette for the product.
IDEATION
_edited.jpg)

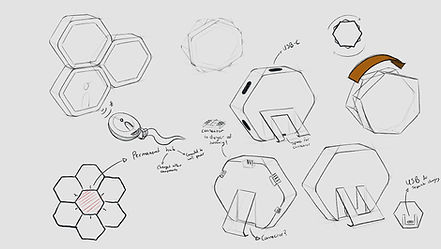
Investigated adding motion gestures to interact with the product.
.png)
%2000.png)
Ideas on how to use the app, looking at photo selection, how to upload to screens, how to add screens, and how to change layout.


Ideation about making the product an interactive board for the family to use whilst still being a photo frame when not in use.

.png)
Ideation with a key fob, where you could upload a photo to it than take that fob to the office or to your parents house and upload the photo to their frames.


Originally the device was to be wall-mounted but with feedback from the participant we investigated mounting it to a base instead.

Investigated introducing a time-management function to the product. Through the app you could log the tasks that needed to be completed that day and they would show up on the screens as a reminder.


The most obvious solution seemed to be to have hexagon-shaped screens in the hexagon frame, but after some market research it was found that it would be rather expensive to manufacture this specific shape.
Production
Case/Outer shell
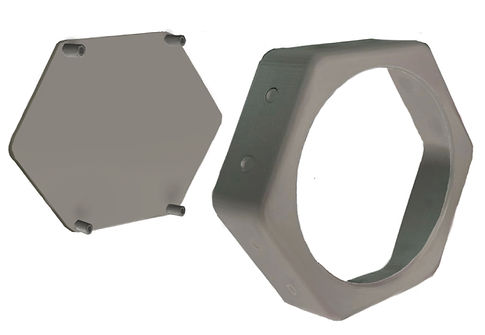
The frame is built in two parts, the body and the back. The body holds all the electronics inside, and has a hole made for the screen to be seen. The back is a flat surface to cover the back, it has screw guiders which allow the screws to attach to the right place, and for the back piece to fit in properly.
The chosen material for these two pieces is thermoplastics such as polyethylene, which is one of the most common types of plastics used in today's industry to make plastic objects like TVs, computers, etc.
From the PRIMA selection matrix, a manufacturing process can be chosen. As it is not known how many sales the product will have, a smaller batch must be created to minimize the risk of not selling all the products. This initial smaller batch will be of around 500 or less products. This means that the possible options to work with are compression moulding, vacuum forming, and rotational moulding. Each of these processes has its advantages and disadvantages.
Compression moulding is a good option to use, as the shape of the body can be easily achieved, as well as the back with its screw guiders without having to cut out and waste material. A disadvantage is that the holes in the side, for the magnets to be set in, cannot be done with the mould, as removing the piece would be impossible as parts of the mould would prevent it.
Vaccum forming is also a good option to create the general shape. Again, it would not be able to make the holes for the magnets as the mold would prevent it from coming out. Also, the hole for the screen to be seen would have to be cut out, adding an extra step and waste of material.
Lastly, rotational moulding is also a possible option. It would be great if the shape was a whole, as it would make it with a single step, but a screen and electronics must be put inside. Also, like in the other moulds, removing it would be very hard as the part of the mould making the holes for the magnets would prevent it.
Due to not being able to remove the mold if the outside holes must be made, the process of making the body must be divided into two parts, making the general shape of the body, and adding the holes.
If we do this, compression moulding is the most suitable production process for both the body and the back cover. For the body, the general shape means the heaxagonal shape without the hole for the magnets, and the secondary process would then be melting holes 5mm diameter with a 3mm depth. For the back, it would be a single process of compression moulding to make the needed shape.
Another completely different option would be to 3D print both parts, this option would be simpler and cheaper, but most likely, more time-consuming. Depending on the printer that is used, the whole process, with a single printer, would take between 3 weeks and 1.5 months to print 500 body parts and 500 back parts. However, with 10 printers (for example), this could decrease to 2-3 days up to 6 days. Of course, this process with the current machinery for 3d printing, would only be used in the initial batch, as for bigger batches there are more efficient processes.
In the following batches, the quantity of products will hopefully increase, as they get known in the market and more people buy the digital frames. This will mean that there can be a bigger investment made for the compression mould and a different, more expensive, type of mould can be made for making the body. This mould will open in 6 parts, each completely perpendicular to one side of the hexagon. This will allow for the body to be made in a singular process, as the holes are not an issue anymore since the mould pulls directly out without interfering with the part.
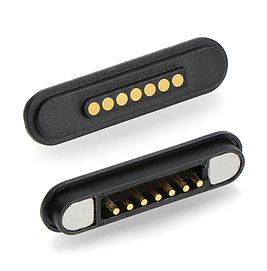
Once the outside casing is done, the rest of the process is positioning each component in its set spot. To start, the 12 magnets, with superglue, and a bit of force fit, are set into its holes. The next step is to adjust the screen to its place. The total screen size (including the un-used borders) is slighly bigger than the opening hole for the screen, therefore it is set properly centered, and attached into place. An accelerometer is also added inside the frame, so that the frames orientation is known, and there are never pictures flipped upside down. Lastly, a motherboard is included, where all the functions are set for the frame to properly work.

Circular LCD Capacitive Touch Screen
PRICE: €15
https://www.alibaba.com/product-detail/Startek-Custom-Circular-LCD-Capacitive-Touch_1600724568048.html?spm=a2700.galleryofferlist.topad_classic.i5.2d1d4757LvRpHO
Custom PCB
PRICE: N/A
Accelerometer & Gyroscope
PRICE: €0.15
https://www.alibaba.com/product-detail/IMU-ACCEL-GYRO-3-AXIS-I2C_1600770446823.html?spm=a2700.galleryofferlist.topad_classic.i4.403168c65llhUZ


Components
The components we would need to produce the 'HexaFrame' include:
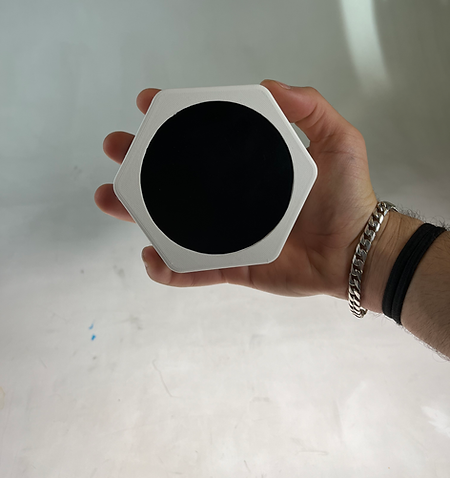
Final Design
-
Add/ remove the hexagons to change the arrangement.
-
Random hexagons will display questions that encourage the users in daily life.
The app will automatically select the photos and upload them to the cloud, and the device will download and display them.
-
Swipe left/ right to view the next/ last photo
-
Double tap to like, the photos you liked will be saved and displayed
-
Scroll down to dislike, the photos you don’t like will be saved in the dislike gallery until you recover them, or they will be deleted in 30 days.


StoryBoard

App Interface
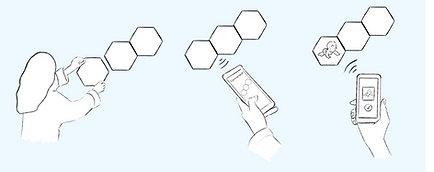
As an extension to the photo frames, a simple app was created. The purpose of this app was to obtain photos from the user’s phone and upload them to the hexagon frames. The connection between the app and the frames happens through Wi-Fi network.
The whole idea of the product is to make it possible to highlight the most precious memories fast and efficiently to avoid the user having to scroll through their phone to find the best captured moments. This is why the app does the selection process for the user so they do not have to spend time with that and can enjoy the selection of photos on the hexagon screens.
Below, the user interface of the HexApp will be explained. One of the biggest focuses when designing the app was on making it as simple as possible. Since the main interactions are happening on the hexagon screens.


The gallery page shows all the photos that were obtained from the device’s photo app. The photos are displayed in a single row where the user can browse by swiping sideways. The photos can be uploaded to the HexApp by clicking on synchronise with device. Clicking this button will bring the user to the photo app of the mobile device where the folder with the photos featuring the baby can be selected and after selecting it, the folder will be uploaded to the HexApp. This concept makes use of the face-recognition the photo apps use these days. Photo storing apps such as Google Photos or the Gallery of iPhones can create albums of people based on the face-recognition technology. In case the user wants to upload photos to the HexApp outside the selected album, it can be done by clicking on upload from device. By clicking on upload to frame, a randomised selection of 50 photos currently being in the gallery will be made and will be uploaded to the HexaFrames through Wi-Fi. The app does not provide a preview of the selection, this aspect is a feature of the frames. On the hexagon screens, there are multiple ways of interaction with the product that make it possible to create the best photo wall.
Gallery


By double clicking on a HexaFrame device, photos can be liked. On the screen this does not change anything, the photo will stay there until the user wants to change it. However, the app recognises when a photo is liked and will save it on the favourites page. Here the user can find all the previously liked photos. This feature helps to highlight the most precious moments even more. By clicking on create photo album, the app will provide a layout with the favourite photos that can be printed and turned into a physical photo book. The selection of favourites and the layout can be adjusted by the user.
Favourites


When the user deletes a photo from the hexagon screens by swiping down, the photo gets removed from the storage of the HexaFrames. However, the swiping down can happen by accident, thus the photo will not be deleted from the app immediately, but it will be put on the deleted items page. Here, the user can find all the previously deleted photos and can restore them within 30 days. When a photo gets restored, it will be put back on the gallery page and can be uploaded to the HexaFrame when the user uploads the next batch of 50 photos to the frames.
Deleted Items
Interactive Model
The electronic prototype is made using an Arduino Uno and TFT ILI9341 touchscreen display. The screen is provided with a micro-SD card, which include 9 stock images, converted into low-resolution bitmap images that are compatible with the screen. The code that was written for the Arduino allows the user to scroll through, like, and dislike the pictures. Upon disliking, the photo is removed from the array of pictures and will no longer show up. Since swiping is not a native feature of the screens, the choice was made to simplify the interaction into tapping. However, the touch zones for certain interactions (see Figure 1) are allocated in a way that the user is likely to start the swipe motion in that zone (i.e. when swiping right, most people start the swipe motion at the left side of the screen). This allows the prototype to still realistically emulate the use for testing purposes.

Swipe left to display a new photo or right to display a previous photo

Double tap the screen to like/select the photo and to remain in the HexaFrame library.

Swipe up or down to delete/ remove the photo from the HexaFrames library.

Figure 1
Product Model